GitHub Setup
GitHub Account
If you do not currently have a GitHub account, please sign up.
Install Git
Git is a version control system. It helps you to write code in teams, as you must do for this course, without breaking each other’s code. It also lets you keep a record of the changes you make, so that you can go back to earlier versions, if you need to.
- To install git follow the instructions here. On Windows you should use the default options.
- Linux systems often have Git installed already. If not, typing something like
sudo apt install gitshould install it.
- For Mac or Linux systems you also need to install the Git Credential Manager Core (this is automatically installed for Windows). Instructions are here. Linux can be slightly fiddly - try using the plain text option 4 for credential storage.
- For more help, try the instructions here.
Link Git and GitHub
Git is a version control system that keeps track of changes to projects. GitHub is an internet repository where these projects are stored. We will work with projects that are stored on your own computer but will regularly sync local data to the online GitHub repository. To do this, we need to make sure that your local Git installation can communicate with your online GitHub account.
- You will need to use a terminal to talk to Git. In RStudio you can launch a terminal using Tools>Terminal (the terminal will be in the bottom left panel). Make sure you have re-started RStudio after installing Git before you do this. There are other terminal options but these depend on your operating system. See here for some suggestions.
- Once you have opened a terminal window, try typing
git --versionThis should return the version number of Git that you have installed. For me this is:
git version 2.37.0.windows.1 - You then need to link your Git installation to your GitHub account. To do this, type
  git config --global user.name 'Jane Doe'
  git config --global user.email 'jane@example.com'
  git config --global --list
in the terminal, replacing Jane Doe by your name and jane@example.com by the email address that is associated with your GitHub account.
Link GitHub and RStudio
RStudio has inbuilt tools that make it easier to work with Git and GitHub. The final step is to check that we can link RStudio to GitHub.
Set up a new GitHub repository
First we need to set up a new repository (repo) to work on:
- Login to your GitHub account here, click on Repositories and then click on New to set up a new repository.
- Follow the instructions. If you are working on assessed coursework you will need to set your repository to private. Add a README file so that you have something to edit.
- You can add files directly to your repo via the web interface, but below we will see how to add files using RStudio.
Use RStudio to clone the repository to your local computer
The first step is always to bring files into RStudio so that you can edit them, run them, view your results, and interpret them. This action is called cloning.
The next few steps will walk you through the process of getting information from the repo to be cloned, cloning your repo in a new RStudio project, and getting started with the analysis.
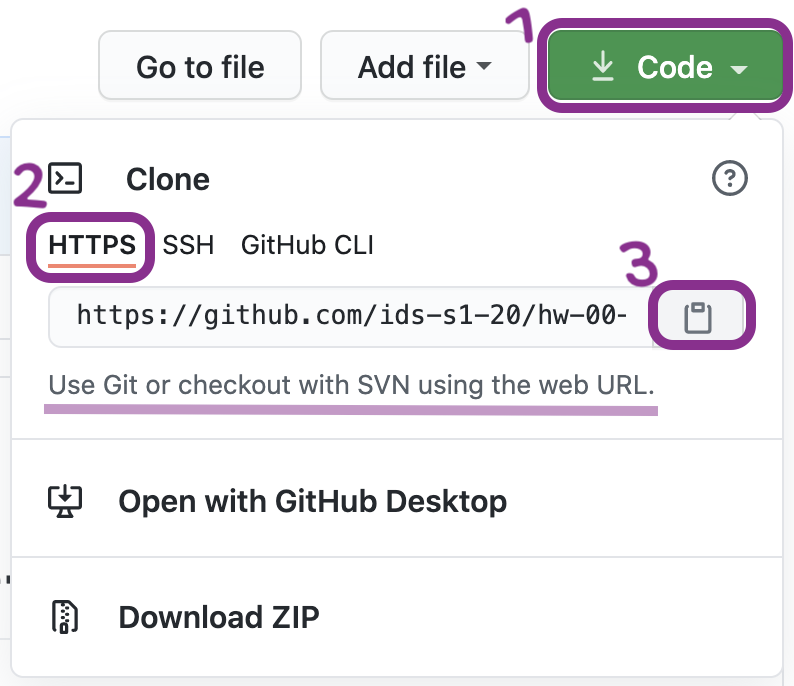
- In the new repository you have created on GitHub, click on the green Code button, select HTTPS (this might already be selected by default, and if it is, you'll see the text Use Git or checkout with SVN using the web URL).
Click on the clipboard icon () to copy the repo URL.
- In RStudio open a new project using
File > New Project > Version Control > Git.
In Repository URL, paste the URL of your new GitHub repository.
- Accept the default name, check the project is being saved in the place you want and click Create Project.
- These steps should open your test GitHub project. If you check in the files pane (bottom right panel in RStudio) you should see the README file you created. Try opening this, editing it and saving the changes.
Well done - you have successfully cloned the repo!
Pushing changes back to GitHub.
In the last section we saw how to clone a repo, but we also need to be able to sync changes we make in RStudio to GitHub. This is known as pushing changes to the repo. The following steps explain how to do this:
- Click the Git tab in the upper right pane in RStudio. Check the staged box for the README file and click commit. A Git box should pop up.
- Write a commit message describing the change you have made and click commit again. Now click push (the green arrow). This pushes your changes to GitHub.
- Now go back to the online GitHub repository and hit refresh. Find your README file - it should show the changes you just made in RStudio.
Set up a GitHub repository for coursework
For the homework and labs you will be provided with a template file to start off with. This file will be uploaded to a repository on the course GitHub page. In this section we go through how to copy this repository containing the template file to your own account. For the homework you will need to use a private repository. This is so that others will not be able to see your work.
- Login to your GitHub account here, click on Repositories and then click on New to set up a new repository.
- Click Import a repository .
- Open the course GitHub page in a different tab, navigate to the repository you want to copy and get the URL by clicking on the green code button and copying the URL shown. Note that as all the labs etc. will be saved in the same repository, you will have to copy the full repository each time you want to add a new lab.
- Go back to your own GitHub account and paste the URL into the "Your old repository’s clone URL" box.
- Add a repository name. Don't use any spaces in this.
- Choose whether the repository should be private (for homework) or public (for labs).
- Select Begin import
For group work, one person can set up the repo and invite the rest of their team to collaborate on it. To do this:
- Log on to GitHub, nagivate to your repo, and click on Settings.
- Click on Manage Access from the left hand menu, and then on Invite a collaborator - you will need their github user name.
- Note that collaborators have to accept the invitation before they can save work (push) to the github repo – this applies whether the repo is private or public.
Once your new repository is set up you will need to clone it to RStudio as described above.
Help
Congratulations! You have now set up RStudio to work with GitHub.
If you need more help with any of this a good place to start is the information here. The lecturers and tutors will also be available to work through these steps with you in the workshops on Fridays.